20346D Module 1 Lab Answer Key
20346D Module 1 Lab Answer Key
Lab 1A: Setting up the Lucerne Publishing Datacenter Environment
Scenario
In this preliminary lab, you set up Lucerne Publishing�s datacenter for their �on-premises� infrastructure. This process requires students to set up a Windows� Live ID.
If students have not yet completed this, they should do so now by performing the first task in Exercise 1. Students can skip this task if they have already completed these steps.
There are existing virtual machines in the LODS environment that represent both the Lucerne Publishing datacenter and the Lucerne Publishing corporate network. Each student in the classroom will have their own environment and unique public IP address, which means that Exchange can be migrated to Office 365 and Single Sign-On (SSO) can be enabled from any computer.
Objectives
By the end of this lab, you will have:
�Signed up for a new Windows Live ID.
�Reviewed the Lucerne Publishing datacenter environment.
Lab Setup
Estimated Time: 10 minutes.
Virtual machine: 20346C-LUC-CL1
Username: Student1
Password: Pa$$w0rd
The classroom environment consists of the following virtual machines and domain names:
NOTE: it can take 3-5 minutes for your Lab environment to start
Virtual machines:
LUC-CL1 is a Windows 8 computer, representing a remote, non-domain-joined workstation. Runs on the LODS host.
LUC-DC1 is the domain controller and DNS for Lucerne Publishing. Runs on the LODS host and represents a server in the "Lucerne Publishing datacenter".
LUC-EX1 is the on-premises Exchange server for Lucerne Publishing. Runs on the LODS host and represents a server in the "Lucerne Publishing datacenter".
LUC-SV1 and LUC-SV2 are the AD FS server farm for Lucerne Publishing. They run on the LODS host and represent servers in the "Lucerne Publishing datacenter".
LUC-SV3 is the AD FS Proxy server for Lucerne Publishing. Runs on the LODS host and represents a server in the "Lucerne Publishing datacenter".
LUC-CL2 and LUC-CL3 simulate domain-joined workstations, but for this course are actually Windows Server 2012 computers with the Desktop Experience feature enabled. They run on the LODS host and represent servers in the "Lucerne Publishing datacenter".
Domain names:
LucernePublishing.local is Lucerne Publishings internal private domain name.
LucernepublishingXXXX.onmicrosoft.com is the temporary Office 365 domain assigned to Lucerne Publishing at the start of the pilot project, where XXXX is a unique Lucerne Publishing number that you will enter during Lab 1B in this module.
LabXXXXX.o365ready.com represents Lucerne Publishings public domain name (such as LucernePublishing.com), where XXXXX is a unique O365ready.com number that you will enter in Lab 2B in the next module.
Exercise 1: Set Up and Configure the Lucerne Publishing Data Center Environment
Scenario
Lucerne Publishing currently has a datacenter in Geneva that hosts the company�s on-premises environment, which consists of Active Directory Domain Services, Exchange Server 2013, their document management system, customer relationship management (CRM) servers, and an enterprise resource planning (ERP) system. In effect, the IT department acts like an independent supplier and client computers connect to this datacenter environment over the Internet through its fixed IP address. Connectivity to the Internet is provided through a local Microsoft Threat Management Gateway server, which proxies out the requests to the data center.
In this lab, the main task for this exercise is as follows:
- Sign up for a Windows Live Account (if needed)
Task 1: Sign up for a Windows Live Account (if needed)
NOTE: Students may have already completed this task prior to arriving for this course. If you have not yet completed this task, then you should do so now. If you have already completed this task, then you may proceed to Lab 1B when your instructor tells you to.
1. Log on to LUC-CL1 with a user name of Student1 and a password of Pa$$w0rd.
2. On the Start screen, click Desktop. (This is the black tile with LUC-CL1 on it.)

4. In the address bar, enter http://live.com and press Enter.
5. On the Sign in page, click Create one! to create a new account.
6. On the Create an Account, enter your first and last name.
7. In User name, select a user name that is not currently in use.
Please document this: ________________________
8. Leave the domain name as outlook.com.
9. In Create password and Reenter password, enter a suitable eight-character or longer password. Make a note of this password. Please document this: ________________________
10. Under Country/Region, select your local region.
11. Enter a Birthdate.
12. Select your Gender.
13. Under Country code, select the country code for your mobile device.
14. In Phone number, enter the number of your mobile phone. (This must be a valid cell phone number as a text message will be sent to it to validate the account.)
15. In Alternate email address, enter your existing email address.
16. Under the Enter the characters you see, type in the letters and numbers displayed. (Click New for a different combination if required.)
17. Click to clear the Send me promotional offers from Microsoft, you can unsubscribe at any time option.
18. Click Create account.
You can check the correct operation of this identity by opening a new tab in Internet Explorer (on LUC-CL1) and visiting www.outlook.com
Lab 1B: Preparing for Office 365
Scenario
The labs in this course involve Lucerne Publishing, a global media corporation based in Geneva, Switzerland. Lucerne Publishing currently uses a dedicated data center to run its on-premises environment but is looking to move to Office 365 over the next three months. Remi Desforges, the long-serving Chief Information Officer (CIO), has been instructed to ensure the migration project goes smoothly. He has appointed Justin Muller, the Chief Technology Officer, to head up the team. Justin has engaged Alain Richer as the partner Office 365 implementation consultant.
Objectives
By the end of this lab, you should be able to:
�Plan for a FastTrack Pilot of Office 365.
�Provision tenant accounts in Office 365.
�Set up a management computer.
�Check client connectivity to Office 365.
Lab Setup
Estimated Time: 75 minutes
Virtual machine: 20346C-LUC-CL1
Username: Student1
Password: Pa$$w0rd
This lab is partly a paper-based planning lab and partly hands-on. You should check your answers against the lab instructions to ensure that you have the right answers for a particular section before moving onto the next one.
Where you see references in the steps to lucernepublishingXXXX.onmicrosoft.com, you should replace XXXX with the unique Lucerne Publishing code that you assigned when you set up your Office 365 accounts in Module 1, Lab 1B, Exercise 2, Task 3, Step 5.
Exercise 1: Planning a FastTrack Pilot
Scenario
Alain Richer needs to create a plan for the FastTrack pilot at Lucerne Publishing; therefore, he needs to ask Justin and his team some questions. He sets up a meeting with Justin Muller, Heidi Leitner (the Network Manager), and Coralie Emond from the IT Department. Heidi has been assigned the task of working with Alain to set up the company account on Office 365, and Coralie will be involved in the day-to-day administration.
The main tasks for this exercise are as follows:
1. Extracting Customer Information
2. Extracting Customer Information - Answers
3. Identifying Activities within the FastTrack Pilot
4. Identifying Activities within the FastTrack Pilot - Answers
Task 1: Extracting Customer Information
1. You are Alain. What discussion headings should you bring to this meeting to ensure you extract the information that you need from Lucerne Publishing to start planning the FastTrack Pilot?
2. When you have listed your questions, go to the next Task for the answers.
Task 2: Extracting Customer Information - Answers
This task provides the answers to the question from the prior task.
1.The headings that Alain would use are as follows.
a. Services - what Office 365 services do you want to Pilot?
b. Users - what do they do and where do they work?
c. Devices - what devices do users have and is there a bring-your-own-device policy in place?
d. IT delivery - how does the company currently deliver IT and how is this service viewed and managed?
e. Workloads - what workloads does the company have that can�t be migrated to Office 365?
f. Pilot users - how many do there need to be and in which departments?
g. Management support - what is the attitude to the cloud within the company and do we have executive support?
h. Success Criteria - how will you define success and how will you measure it?
i. Feedback - how are you going to capture feedback about the pilot?
2.The answers from the Lucerne Publishing team are set out below.
a. Services - what Office 365 services do you want to Pilot?
Everything except Project and Visio.
Definitely moving from Exchange Server on-premises to Exchange Online.
Keep in-house document management but evaluate SharePoint Online.
Very interested in Lync - don�t currently have it.
Yes to OneDrive for Business.
Yes to Yammer.
b. Users - what do they do and where do they work?
Executive team of 50, spread all over the world, including the heads of the remote headquarters.
Below them are 255 management level personnel, who work either here at HQ or in the regional offices.
Around 1,600 employees, some at HQ, some in the regional offices, and a few working from home occasionally.
More than 2,500 freelancers who work from home, but they�re not going to be part of this phase.
c. Devices - what devices do users have and is there a bring-your-own-device policy in place?
Senior Execs can use whatever they like.
Some of them are on iPads, some on Android tablets, a few more on Windows RT devices and some with PCs.
Same BYOD policy for management, although they do tend to be more PC-based and more static in terms of their locations.
Employees are all provided with PCs, either workstations or laptops.
Associates use whatever they want as long as it is compatible with the company�s file formats.
d. IT delivery - how does the company currently deliver IT and how is this service viewed and managed?
IT is very much a centralized function.
Main corporate data center here in Switzerland. The company doesn�t actually say where it�s physically located, but they do have very good network connectivity from HQ. The architecture is based on Microsoft�s private cloud design, although they haven�t fully virtualized all the workloads yet.
e. Workloads - what workloads does the company have that can�t be migrated to Office 365?
The company has the following workloads that cannot be migrated at the moment:
Content management system (although that may migrate to SharePoint later) together with its SQL Server database.
The ERP system.
The HR system and database.
Everything else could potentially migrate to the cloud.
f. Pilot users - how many do there need to be and in which departments?
Five percent of users results in around 100 pilot users. These should be a representative sample from the departments, but not include mission-critical users such as Helpdesk staff.
g. Management support - what is the attitude to the cloud within the company and do we have executive support?
The CEO does not deal with that level of technical detail any more. However, the COO is keen to move the project forward.
h. Success Criteria - how will you define success and how will you measure it?
Success will come from the pilot users. If they like the experience of using Office 365 and let the company know, then the company will consider the pilot a success.
i. Feedback - how are you going to capture feedback about the pilot?
The company already has a web-based feedback system setup. This internally-designed system records and collates the information on the pilot.
Task 3: Identifying Activities within the FastTrack Pilot
1. You are assembling the information into a FastTrack Pilot phase plan. Outline the activities that need to take place and highlight any factors that should be included in your planning.
2. When you have listed the activities in the Pilot phase, go to the next Task to review the answers.
Task 4: Identifying Activities within the FastTrack Pilot - Answers
This task provides the answers to the question from the prior task.
A FastTrack Pilot should include the following activities:
1. Sign up for Office 365.
2. Set up the pilot domain for Lucerne Publishing (for example, lucernepublishing.onmicrosoft.com).
3. Add the pilot users.
4. Connect their existing email accounts.
5. Set up a team collaboration site for your pilot.
6. Prepare the pilot users.
7. Test the pilot configuration with the pre-pilot users.
8. Run the pilot.
Complete the pilot and prepare to move to the Deploy phase.
Result: Lucerne Publishing has signed off on the FastTrack Pilot and wants to test Office 365 in its environment. The company has been provided with a connectivity testing plan and a deployment timetable for the Office 365 implementation.
Exercise 2: Provisioning the Tenant Account
Scenario
The day before the pilot is due to start, Alain meets with Heidi to set up the organization�s Office 365 account. He needs to ensure that they have the right information to set up the Pilot tenant account.
Note: For simplicity, this lab uses an ordinary Office 365 trial account, not a FastTrack pilot extended tenant account. Also note that you need to create an account with a unique name in the form: lucernepublishingXXXX.onmicrosoft.com. You can use any alphanumeric value for XXXX that the Office 365 website accepts.
When you set up the tenant account for Lucerne Publishing, you will be allocated a lucernepublishingXXXX.onmicrosoft.com domain, where XXXX is a four-character alphanumeric code that you assign.
Make note of this XXXX code as you will need it to complete the remaining labs in this course.
The main tasks for this exercise are as follows:
1.Gathering the Required Information
2.Creating the Tenant Account
3.Checking the Office 365 Service Status
Task 1: Gathering the Required Information
This task provides the answers to the question from the prior task.
1.Heidi needs to provide the following information to set up the tenant account:
a.
Country: Switzerland
b.
First name: Heidi
c.
Last name: Leitner
d.
Email: Heidi�s Windows Live account
e.
Address 1: Rue Le-Royer
f.
Postal code: 1211
g.
City: Geneva
h.
Canton abbreviation: GE
i.
Phone: Heidi�s mobile phone number, including international code
j.
Organization name: Lucerne Publishing
k.
User ID: hleitner@LucernepublishingXXXX.onmicrosoft.com
l.
Administrator Password: Pa$$w0rd
m.
Text verification options: Your mobile phone number
Task 3: Creating the Tenant Account (Very Important! When you enter the email address for your Windows Live account, it should be a new, clean account that you have not used before. An account you have used in the past may cause problems in later labs. In addition, you will use your own cell phone. A code will be sent via text to your phone to verify the account.)
1. On LUC-CL1, logged on as Student 1, on the taskbar, click Internet Explorer.
2. In the Address bar, type http://aka.ms/20346 and press Enter.
3. For Step 1, in the Welcome, Let�s get to know you page, complete the following fields. Regardless of your location, use the following information:
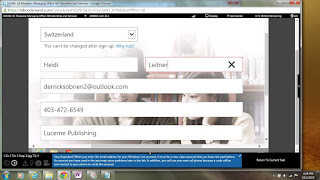
Country: Switzerland (The Country field cannot be changed.)
First name: Heidi
Last name: Leitner
Business email address: (use your new Windows Live account that you created for this course)
Business phone number: Your mobile phone number, including international code for your current country
Company name: Lucerne Publishing
Your organization size: 5-24 people.
4. Click Just one more step.
5. On the Create your user ID page, you have to create a unique domain for the Company name to use in the course. It is recommended that you choose a four-character alphanumeric code and append it after lucernepublishing. You may have to try a few numeric or alphanumeric combinations to create a unique domain value. For the rest of the fields use the following information:
User name: hleitner
Company name: lucernepublishingXXXX .onmicrosoft.com
(where XXXX is your unique Lucerne Publishing number)
Password: Pa$$w0rd
Confirm password: Pa$$w0rd
Deselect all contact options.
MAKE A NOTE OF THE XXXX CODE AFTER LUCERNEPUBLISHING.
____________________
You will use this in all subsequent labs and enter it whenever you are asked to supply a @lucernepublishingXXXX.onmicrosoft.com logon or web site URL.
6. Click Create my account.
7. On the Prove. You�re. Not. A. Robot. page, ensure that �Text Me� is selected. You have to confirm your identity using your mobile phone. In the drop-down box, select the code for the country that you are now in.
8. In the phone number box, enter your correct mobile phone number. (This must be a valid mobile phone number. A text message will be sent to your phone to confirm your identity.
9. Ensure that the Send text message option is selected, and then click Text me.
10. When you receive the confirmatory text on your mobile phone, enter that in the Enter your verification code box and click Next.
11. Wait until the Office 365 tenant is provisioned and then, on the �Save this info. You�ll need it later� page, document your Office 365 sign-in page: ____________________ and also your user id: ____________________. (You may bookmark the page if you like.)
12. Wait until the Office 365 tenant is provisioned and then click on �You�re ready to go��
13. The page you will be brought to is Heidi Leitner�s home page. This page changes from time to time. As of this writing, it says, �Just so you know�This is your home page, It�s a little sparse because you�ve been assigned an admin role but haven�t been assigned any products to use. If you want access to any products, go to Admin > Active Users, and assign a product to you user account. If you want to go directly to the admin portal when you sign in, set your start page to the Office 365 admin center.�
14. Click on the Admin tile to go to the Office 365 admin center.

Task 4: Checking the Office 365 Service Status
1. If prompted, confirm your password by clicking the re-enter my password button. Update the two options or you will be nagged throughout the class. Click finish.
2. You will likely be prompted about changes in the graphical interface for the Office 365 admin center. Dismiss them. Click Switch back to the old admin center as all instructions are tailored to that interface. Dismiss any pop-up screens.
3. Click on Service Health on the left-hand menu, and then click on Service Health again to display the Service Health details.
4. In the left hand menu, click Dashboard. Review the information on the right under Current health. Note that at this point, services may still be initializing.
5. Review any service interruption records or additional information in the status page. Note: During Microsoft�s testing, on rare occasions Office 365 did not create the trial tenant properly; as a result, the tenant did not have all the services available to it. If this happens to you, you should create a new trial tenant using a different business email (Windows Live account).
6. Click the RSS button. A new Internet Explorer tab opens.
7. Click Subscribe to this feed.
8. In the Subscribe to this feed dialog box, click Add to Favorites Bar and click Subscribe.
9. Click View my feeds and confirm that Office 365 Service Health RSS Notifications has been added to your feeds. (Do not worry if the RSS page does not load. It can take a very long time.)
10. Close Internet Explorer.
11. If prompted, click Close all tabs.
Result: You have successfully provisioned the Office 365 tenant account for Lucerne Publishing.
Exercise 3: Preparing to Manage Office 365
Scenario
Lucerne Publishing has accepted the pilot plan but the implementation team feels there is a lack of clarity about how to manage Office 365, the effectiveness of client connectivity to Office 365, and the changes that might need to be made to provide this connectivity.
Following a tense meeting between Remi, Justin, Heidi, and Alain, Lucerne Publishing provides the necessary information. Alain needs to confirm that the management computers meet certain requirements, the right ports are open, and that users can connect from those locations to the Office 365 service centers in each country. Heidi is pretty sure connectivity will not be a problem but decides to check anyway.
The main tasks for this exercise are as follows:
1.Configuring a Management Computer
2.Checking Client Connectivity
Task 1: Configuring a Management Computer
1. Before starting this lab, verify the DNS settings for LUC-CL1.
2. From a command prompt, run ipconfig /all. If the DNS Servers are not Primary - 8.8.8.8 and Secondary - 4.2.2.2, manually enter those values into the properties of TCP/IP.
3. On the traditional desktop on LUC-CL1, click the File Explorer icon in the taskbar.
4. In File Explorer, navigate to Computer -> Allfiles E:LabfilesLab01.
5. Double-click msoidcli_64.msi.
6. In the Microsoft Online Services Sign-in Assistant Setup wizard, on the License Terms page, click I accept the terms in the License Agreement and Privacy Statement, and click Install.
7. In the User Account Control dialog box, click Yes.
8. On the Completed the Microsoft Online Services Sign-in Assistant Setup Wizard page, click Finish.
9. In File Explorer, in E:LabfilesLab01, double-click AdministrationConfig-EN.
10. In the Microsoft Azure Active Directory Module for Windows PowerShell Setup wizard, on the Welcome page, click Next.
11. On the License Terms page, click I accept the terms in the License Terms, and click Next.
12. On the Install Location page, click Next.
13. On the Ready to Install page, click Install.
14. In the User Account Control dialog box, click Yes.
15. On the Completing the Microsoft Azure Active Directory Module for Windows PowerShell Setup page, click Finish.
Task 2: Checking Client Connectivity
1. On LUC-CL1, on the taskbar, click Internet Explorer.
2. In the Address bar, enter https://testconnectivity.microsoft.com/.
3. In the Microsoft Remote Connectivity Analyzer page, click the Office 365 tab.
4. In the Office 365 tab, in the Office 365 General Tests section, click Office 365 Exchange Domain Name Server (DNS) Connectivity Test, scroll down and click Next.
5. Under Domain Name, enter lucernepublishingXXXX.onmicrosoft.com (where XXXX is your unique Lucerne Publishing number). Keep Office 365 as the Service Selection.

7. Click Perform Test.
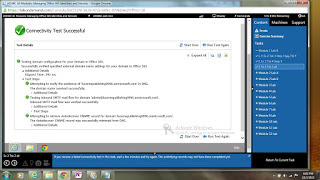
8. Note: If you receive a message about having performed too many tests in 60 seconds, wait for a minute and then repeat the test.
9. When you see Connectivity Test Successful, under Test Details, expand Test Steps and review the checks that have been made against the Exchange Online domain. (If the test does not complete successfully, please wait for a minute and try the test again.)
11. In the Office 365 tab, in the Office 365 General Tests section, click Office 365 Lync Domain Name Server (DNS) Connectivity Test, and then click Next.
12. In the Sign-in address field, enter hleitner@lucernepublishingXXXX.onmicrosoft.com (where XXXX is your unique Lucerne Publishing number), keep Office 365 as Service Selection and then click Perform Test.
13. Note: If you receive a message about having performed too many tests in 60 seconds, wait for a minute and then repeat the test.
14. When you see Connectivity Test Successful, under Test Details, expand Test Steps and review the checks that have been made against the Lync Online domain. (If the test does not complete successfully, please wait for a minute and try the test again.)
15. Click Start Over.
16. In the Office 365 tab, under Microsoft Exchange ActiveSync Connectivity Tests, click Exchange ActiveSync, scroll down and then click Next.
17. In Exchange ActiveSync, select Use Autodiscover to detect server settings, then under Email Address, enter hleitner@lucernepublishingXXXX.onmicrosoft.com (where XXXX is your unique Lucerne Publishing number).
18. In Microsoft Account, enter hleitner@lucernepublishingXXXX.onmicrosoft.com (where XXXX is your unique Lucerne Publishing number).
19. In Password and Confirm password, enter Pa$$w0rd.
20. Check Ignore Trust for SSL.
21. Check I understand that I must use the credentials of a working account from my Exchange domain to be able to test connectivity to it remotely. I also acknowledge that I am responsible for the management and security of this account.
22. Click Perform Test.
23. When you see Connectivity Test Successful, under Test Details, expand Test Steps and review the checks that have been made against Exchange ActiveSync. (If the test does not complete successfully, please wait for a minute and try the test again. You may also continue on and try the test again at the end of the lab. Note: This test often fails early in the lab but should work later.)
24. Click Start Over.
25. Under Microsoft Office Outlook Connectivity Tests, click Outlook Connectivity, and then click Next.
26. In Outlook Connectivity section, in Email Address and Microsoft Account, enter hleitner@lucernepublishingXXXX.onmicrosoft.com (where XXXX is your unique Lucerne Publishing number).
27. In Password and Confirm password, enter Pa$$w0rd.
28. Select Use Autodiscover to detect server settings.
29. Check I understand that I must use the credentials of a working account from my Exchange domain to be able to test connectivity to it remotely. I also acknowledge that I am responsible for the management and security of this account.
NOTE: the new Admin Center has a built-in connectivity analyzer
You can also download it here .. https://testconnectivity.microsoft.com > Client tab "More Tools"


Comments
Post a Comment